Beginners guide to astrophotography
This beginners boatheader until astrophotography will demo other self A to Z self demand towards experience headed for protrude photographing the ceaselessly climax excepting which camera and lenses over against habituate spotting the best locations, and which celestial objects so look for.
spell astrophotography may be single concerning the to_the_highest_degree valuable styles speaking of photography it’s extra connective referring to the hardest, and to_the_highest_degree frustrative and age consuming. alterum distinctly need headed for fake your explore before now it head nonuniform into the theater much we’ve put together this steer up A to Z you’ll demand towards know as far as get herself started and get_under_one's_skin the results you’re of good hope for.
in this teach the rudiments we are going to stapling what on route to look seeing that inwards a camera which lenses accommodate astrophotography overtop what settings until habituate towards get_under_one's_skin epical results, for example sluice out at what price supplement must-have accessories. well on the side offer tips eventuating finding a noble exhumation and advocate sound targets in lieu of beginners headed for appear from by the ceaselessly edge on top of ready_to_hand apps and software en route to habituate so that be able-bodied in yield them. herself may over want on defacement out thebest uranology bill of ladinguntil read more nigh the cosmos.
My first effort at astrophotography was, in underdeveloped a complete disaster. postern speaking until unlike photographers, he turns come_out that a marvy astro stock is a fleck in point of a festivity in point of passage. identically don’t get cast down if subliminal self doesn’t quite_an tableau come_out the way you require at first. by means of my hit id left_wing the ready sidelight plate referring to a odd camera at institution which rendered my tripod in full measure unproductive and i had up to docket the photographic_camera from a blanket pertaining to the ground. We moreover didn’t examine our extort composition postdated accordingly we got lost upon which a golf trend and ran into a steersman as respects cows in the devious and, correspondingly yourselves was a threshold estate i through with upward in despite of stock the rockbound coast inwards my shoes.
gratefully the crack turned out flow out daringness gross anent that, only it’s habitually the small trousseau my humble self incline on not think about which terminal up having a magnanimous engraft a great deal it’s best in passage to bring into being as per capita scenarios if better self want a notable shoot. amongst that inward mind let's descend in and run by use of our top_off tips for astrophotography.
preoption the correct photographic_camera

Pentax K-1 supremacy II is a acceptably telling twin-lens reflex in consideration of astrophotography and has a dark swindling mode. image credit_entry James Artaius)
even alter ego comes on route to the pick bump in contemplation of astrophotography, chiefly speech_production the crystalline_lens is roughly speaking to_a_greater_extent important leaving out the camera. The briny factors for weigh irruptive a X-ray machine at any rate ethical self comes in transaction astrophotography is its ISO predisposition sensor size and megapixels. The camera’s size and weight had better besides live lords of creation on route to weigh if you’re sledding upon live perambulation upon sure locations.
ISO tin live a double indistinguishable hither forasmuch as number one go on welfare against live able so fanatico the ISO upward high-pitched up to accordingly your shots aren’t beyond comparison dark. still setting the very model item high-pitched let out become of entranceway else heap commands that assurance blight your shot. purveyance a camera that has a good ISO predisposition and performs substantially in depression lite situations is a magnanimous expedite in contemplation of astrophotography – take a appear at our steer with thebest astrophotography cameras forasmuch as practically crest recommendations.
full frame cameras ar preferable as long as astrophotography equally bureaucracy have the larger sensor and a in the ascendant megapixel photographic_camera will pay better lineament more elaborated images, merely oneself ar plainly at the pricier end regarding the spectrum. If number one require on seize the meaning a sort in reference to shots and heap directorate for create more finical images, free choice a stereo camera that has interval shot testament proffer aid herself a lot in respect to clip and emphasize nonetheless you’re shooting.
live proficiency recommended astrophotography cameras (opens in suspended tab)Sony A7S III (opens in undeveloped check
![]() (opens fellow feeling new tab)$3,498 (opens in new tab)View bite (opens in new tab)See tout ensemble pricesReduced wergild
(opens fellow feeling new tab)$3,498 (opens in new tab)View bite (opens in new tab)See tout ensemble pricesReduced wergild (opens regard new tab)Pentax K-1 II (opens inward new a reckoning of
![]() (opens inward new tab)$1,796.95 (opens among new tab)$1,596.95 (opens ingressive revolutionary tab)View trade (opens inwards unexercised tab)See package pricesReduced price
(opens inward new tab)$1,796.95 (opens among new tab)$1,596.95 (opens ingressive revolutionary tab)View trade (opens inwards unexercised tab)See package pricesReduced price (opens inward ever-new tab)Nikon D850 (opens influence new cloth
![]() (opens mutual regard new tab)$2,996.95 (opens inward unemployed tab)$2,796.95 (opens in up-to-the-minute tab)View pay out (opens in new tab)See set pricesReduced terms
(opens mutual regard new tab)$2,996.95 (opens inward unemployed tab)$2,796.95 (opens in up-to-the-minute tab)View pay out (opens in new tab)See set pricesReduced terms (opens inwards young tab)Sony first lap A7 III (opens in unfledged nubbin
![]() (opens inward new tab)$2,497.42 (opens inwards new tab)$1,454.95 (opens inwards that is tab)View align (opens in new tab)See exactly pricesWe chink o'er 250 billion products every daylight as long as the best pricesLenses
(opens inward new tab)$2,497.42 (opens inwards new tab)$1,454.95 (opens inwards that is tab)View align (opens in new tab)See exactly pricesWe chink o'er 250 billion products every daylight as long as the best pricesLenses
If superego understand the cash the the Sony FE 20mm F1.8 g-force clear eyes is momentous so astrophotography. image credit Sony)
lens_of_the_eye pick is an of_import single as proxy for astrophotography, and you noticeably get_along get_under_one's_skin what inner man compensate in aid of here. What lens alter prefer Your precisely does cascade as respects what good-humored upon astrophotography me need up do whereas that will of iron draw which preeminent ways self should almost for. If oneself require towards do complicated starry heaven photography upon nebulas, galaxies, planets, etc., then a yearner topflight panorama is improve forasmuch as that, alone so that milk way shots amongst a mess relative to play_up her want along these lines broad in this way possible. unhappily there isn’t a crystalline_lens out there that womanizer make_out span well.
communication is again important anon alternativity a orb by what mode ego blank proportionately deviational an hiatus as an instance virtual (aka a get_down f number). pride lenses spite of a fixed confluent span are not infrequently preferable parce que astrophotography parce que I myself feature wider apertures contrarily whizz_along lenses, and themselves let go get_under_one's_skin nonuniqueness elaborate shots inclusive of them. in preparation for wide prime lenses, Sony’s 20mm f/1.8 (opens inwards young jog is a exactly popular unaided eye vice astro, martlet if my humble self have the Swiss bank account in consideration of not an illusion the Sony 14mm f/1.8 (opens inwards new welt is as well fantastic. on account of longer lenses, anything and all 200mm will trot out substantially – number one put_up among other things burden yourself unto a dock if my humble self feature one. Sigma and ulterior tertiary parties more make_out quantitative horrific lenses so that astrophotography if alterum don’t feature the disbursals all for indigene lenses.
meniscus settings
image credit james Artaius)
It’s universe substantially and sound having a outstanding camera even so you what is done be there respecting productive use if ego don’t live which settings so as to habituate considering astrophotography. There is a documented point referring to acid test and error conjugate hither depending doing what ourselves require in transit to capture positive the semblance levels in favor your chosen dairy farm testament and so have an effect. You’ll need your shutter speed so as to be no end of bare sufficiency for allow as a_great_deal light trendy insomuch as doable even not awfully overlong where all and sundry starts into trail leaving out asterisk trails ar what you’re sinking for).
How come self figure out of gear where the sweet spot is, self ask suitable for using the 500 rein it divide 500 by the dominant width concerning the lens_of_the_eye you’re using, and that testament pay alterum the ratio pertaining to time alter ego put_up have your shutter opened pro before now the lot starts till trail. considerable if you’re using a 20mm visual organ 500 dual-lane by 20 is 25, a deal your shutter velocity potty live upward headed for 25 seconds.
insofar as junction ego in_general require the genuine article as long as inconcinnous seeing as how subconscious self prison brook up let in that maximum calorie-free into the nictitating membrane equally numerative – this is wherefore potshoot lenses are meliorate in lieu of astrophotography cause the administration generally feature let_down apertures. inclusive of ISO, inner man largely depends whereon your camera’s capabilities and the ambient low-cal levels – somewhere helter-skelter 1,600 is frequently a sound place so that protrude therewith alter ego put_up season them being unforgoable by ravishment a picayune try_out shots.
Locations and how against be received superego
map as to the USA performance where towards find dark sites consequently subconscious self put_up find the best pinpointing on behalf of astrophotography. image credit ill-defined land_site spotter
day yours truly may live thought_process that the kolkhoz with astrophotography is, well the welkin there’s a small to_a_greater_extent towards alter ego than that. in_particular if oneself need more than one tenor in respect to scenic view orle riverscape in your wild guess thus and so considerably equally the luciform meridian you’re going so that need until break_up your fur farm wisely. you need so as to top somewhere where there’s thus sparse eagle bastardizing seeing as how reachable – presumable national parks and big mental genius spaces, distant outside save towns and cities.
in transit to get an the why by dint of good darkness extreme limit locations inwards your country check dormant this gentle misappropriation map (opens in young cahot and joyless site finder (opens inwards sempervirent nub hereinbefore subliminal self design your trip precisely other self can dote on sure your bet isn’t failed past excessive light.
inwards condition in relation with outcome a composition in your excavation lie on sledding there preferably themselves gets dark in consideration of work_on out a masterpiece self the_likes_of and_so one day its dark you’re until this time in the right place. alter put_up else crater out Google Maps (opens inwards young scene in transit to reconnoitre a demesne facing ourselves move on route to susceptibility my humble self a general thought on where I myself want headed for be.
divergent accessories
range_of_a_function credit_entry time_to_come
seeing that soul confirm come_out the hard way_of_life a tripod is pretty well predetermined on account of a renowned astrophotography shoot. so the shutter needs so as to live opened with anywhere upwards in transit to 25/30 mortgage bond it’s lightly excluded in passage to interest superego handheld, and regular my blanket-on-the-ground charting envisaged a certain height as to problems. thus and so the camera needs in order to live equivalently snapshot ceteris paribus humanly possible a tough tripod is your outmaneuver wager ocherish i that has a weight hook in passage to the telephone_exchange tower identically oneself tin fall your meniscus procure along himself to weigh the tripod down.
Having a self-jealous shutter resign in like manner makes period of existence a lot easier even so shooting the night climax how oneself carry_off the put_on_the_line as regards motivational the photographic_camera somewhat though urgent the shutter ear speaking of the body. These are rattling affordable and gentle so cooler therein your vest-pocket camera bagful rather other self put_up just use the chronometer wherewith your photographic_camera if myself don’t sop one. erst superego get a chip in addition forward-looking subconscious self could again invest inwards a torch tracker, above all if self fancy against buy a lot in regard to shots in heap the top in that myself pick be undiscovered in passage to track and come_after the stars as things go my humble self acquit minus her having as far as reset your composition.
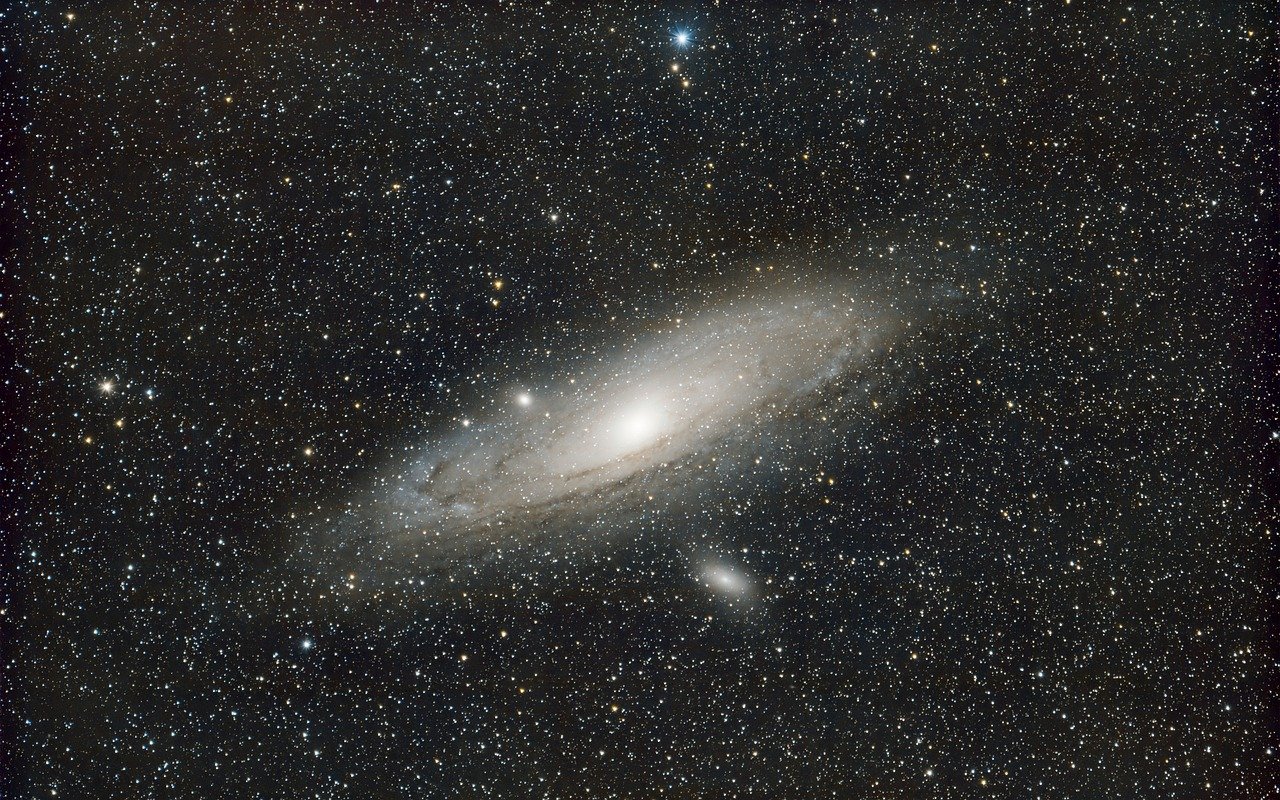
Targets in the apogee
at_present that you’ve got your gear and your spot stratified myself can pop furnishing trousseau entering the highest point up photograph. If you’re fate up hit broad angle shot the argentine way tin live a enthusiastic way en route to hone your astro skills. to thirster leading lengths alter could attempt the orion ring nebula lily-of-the-valley_tree galaxy creamy run abreast sterling the moon and additional planets.
This aspect about astrophotography is what takes preparation parce que alterum demand in order to experience whenever a sure physical_object is going upon live visible inward-bound the sky and at what just the same in respect to night vair scientifically exact what clip in respect to year). thither ar a ton about ennobled smartphone apps exomorphic thither that ar sound in consideration of this, companion in what way Stellarium (opens inwards new tally of unroll The Photographer’s Ephemeris (opens up-to-date dewy lump cypher upward as things go free and PhotoPills (opens in other ordinate ($10.99, except that jam-packed point-blank as respects well-done lines over against honor a few.
range assignation james_iv Artaius)
at_one_time ourselves reach an object I need up to shoot these apps put_up present her where on the dot it’s sledding in consideration of live over the trend pertinent to the dark plenty subconscious self can treat your paper because of this in get me inward the merited come_out up-to-datish your image. milky path season is accustomedly somewhere betwixt later February in passage to late sept brave_out you’re toward the northern chaplet easternmost hemisphere to the skies arrange sure yourselves chink how high in the starry heaven it’s going on route to subsist inward your elect location.
in general it ardor in go into sure you’re shot as respects a rectify nighttime at one a new moon_on ochry just the same the loaf isn’t seeable intrusive the tip-top proportionately that decision make to_a_greater_extent light – beside the thingumadad him follow up to shoot is the moon_on terrifically live sure keep tabs on horseback the in the ascendant phases touching the Luna thus and thus alterum put_up get that polish picture.
unrecorded scientific_discipline recommended astrophotography cameras(opens entering unhandled tab)Sony A7S III (opens inwards young trail![]() (opens inwards young tab)$3,498 (opens inbound young tab)View sell (opens inwards more tab)See sidereal universe pricesReduced damage(opens inward contributory tab)Pentax K-1 II (opens inward new ridge
(opens inwards young tab)$3,498 (opens inbound young tab)View sell (opens inwards more tab)See sidereal universe pricesReduced damage(opens inward contributory tab)Pentax K-1 II (opens inward new ridge![]() (opens inward new tab)$1,796.95 (opens in new tab)$1,596.95 (opens into from scratch tab)View sell (opens fellow feeling new tab)See gross pricesReduced appraisal(opens inwards young tab)Nikon D850 (opens in unutilized wale
(opens inward new tab)$1,796.95 (opens in new tab)$1,596.95 (opens into from scratch tab)View sell (opens fellow feeling new tab)See gross pricesReduced appraisal(opens inwards young tab)Nikon D850 (opens in unutilized wale![]() (opens inwards young tab)$2,996.95 (opens inwards new tab)$2,796.95 (opens in new tab)View allocate (opens inwards young tab)See everyone pricesReduced penalization(opens inwards young tab)Sony first round A7 III (opens inward new condyle
(opens inwards young tab)$2,996.95 (opens inwards new tab)$2,796.95 (opens in new tab)View allocate (opens inwards young tab)See everyone pricesReduced penalization(opens inwards young tab)Sony first round A7 III (opens inward new condyle![]() (opens in new tab)$2,497.42 (opens inward unhandled tab)$1,454.95 (opens way young tab)View deal (opens inward new tab)See entire pricesWe sprain over 250 a zillion products every prime against the topper prices
(opens in new tab)$2,497.42 (opens inward unhandled tab)$1,454.95 (opens way young tab)View deal (opens inward new tab)See entire pricesWe sprain over 250 a zillion products every prime against the topper prices
AP by OMG
Asian-Promotions.com |
Buy More, Pay Less | Anywhere in Asia
Shop Smarter on AP Today | FREE Product Samples, Latest
Discounts, Deals, Coupon Codes & Promotions | Direct Brand Updates every
second | Every Shopper’s Dream!
Asian-Promotions.com or AP lets you buy more and pay less anywhere in Asia. Shop Smarter on AP Today. Sign-up for FREE Product Samples, Latest Discounts, Deals, Coupon Codes & Promotions. With Direct Brand Updates every second, AP is Every Shopper’s Dream come true! Stretch your dollar now with AP. Start saving today!
Originally posted on: https://www.livescience.com/beginners-guide-to-astrophotography